Here she shares her sweet spots, as well as three winning recipe ideas for upcoming Jubilee street parties up and down the land. And if her cakes are good enough for the royals, they’ll do beautifully for us…
Favourite place in all the world?
Napa Valley, California. I absolutely love the climate, the food, the wine and the landscape. Also, it is not too far away from where my kids are based – they are both in LA currently pursuing their careers.
Dream holiday?

I think my dream holiday would be Australia. I have family over there and I’ve dreamed about going all my life. I’d like to do a big four-week tour. I would do a diving course – I’d so love see the amazing marine wildlife.
Most coveted item right now?
It’s my new Ruffoni handmade copper cookware. It reminds me of a splendid palace – I feel like Cinderella!
Proudest professional moment to date?
Having my own TV series, Beautiful Baking. It so lovely to have the opportunity to bring my cakes and bakes to a new audience.
Your dream future project?
Doing another TV series. I am really hoping to do one with my actor son, George. It is currently in development. I would also love to open a bakery in the West End.
Who has been your most inspiring mentor, professionally or personally?
It sounds really cheesy but it’s my husband – we’ll be celebrating 25 years of marriage in the coming weeks. He is my support system and biggest cheerleader.
Where would you live if you could live anywhere?

Santa Barbara for the lifestyle. We have a ready-made friendship group there and we would be close to my kids. Plus I could still have my food career.
What book is on your nightstand/ kindle right now?
I am too busy to read anything but my last good read was a Patti Smith biography that my son gave me.
Best binge-watched TV show?
We just watched Slow Horses starring Gary Oldman. It’s brilliant – I love him as an actor.
Top podcast of the moment?
Diary of a CEO with Steven Bartlett. It’s really empowering and uplifting. He always has inspirational guests and an eclectic mix of leaders.
Your hero?
I am a big fan of Delia Smith because I grew up watching her. My mum had all of her books. My highlight was that I got to make Delia a cake on This Morning – and she took the time to write me a personal thank you note which I have framed on my wall.
If you were an animal, what would you be?
I would be a bird of prey – I’m obsessed with birds. I am always looking up at them soaring in the sky – it is a bit of a joke with my family.
What did you want to be when you grew up?

A pilot or marine biologist. My dad had a plane and my brother was a pilot. I used to take off and land it but I never bothered to take my exams. I was distracted and too busy being a teenager. My dad’s plane was a four-seater Cherokee Piper. We went to the flying club every weekend – we would even fly to France for lunch in Le Touquet or over to Bruges.
Worst job you’ve ever done?
Working in a children’s shoe shop. I hated it!
Favourite dish to cook?
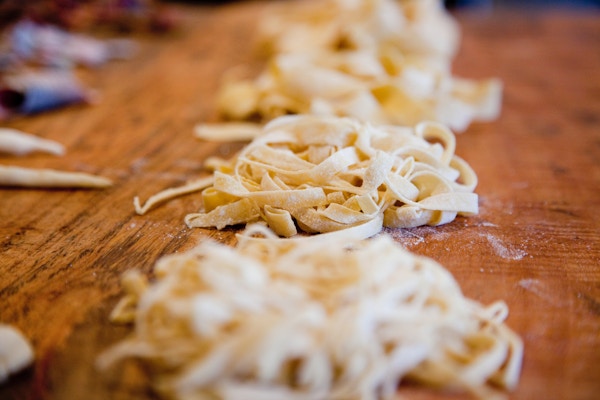
Pasta! I love it, it’s my favourite thing to eat. I make it from scratch and accompany it with mushroom pappardelle or a ragu. I was taught to make the classic sauces.
Favourite café/ restaurant?
Bancone. It’s a pasta restaurant – there is one in Covent Garden and also Soho. It has a relaxed casual vibe. It’s tops!
What tune always makes you want to dance?
Abba’s Dancing Queen. Classic!
Favourite website or app?
I, like many people, have a love-hate relationship with Instagram. Also MyFitnessPal because I am always tracking my calories.
Most useful thing on your desk?
I don’t have a ‘desk’ as such – my kitchen is my office, so it would have to be my stand mixer.
Which five people, dead or alive, would you find most interesting to be stuck in a lift with?
Jack Black, Guy Garvey lead singer of Elbow, Emma Thompson, Chris Packham and Helena Bonham Carter.
Favourite building?

The Shard – I can always see it from so many points in London. It also looks amazing from the inside. I even did a This Morning live wedding from it.
Favourite Instagrammer or tweeter?
I think my favourite social media person is Jack Black – he is hilarious and just makes the best content.
Your screensaver?
My dog, Dougie – he is a Jack Russell.
What would your biography be called?
I Could Do Without This!
What would be your epitaph?
It’s magical!
Take Three: Juliet’s Recipe Suggestions For Jubilee Parties This Weekend
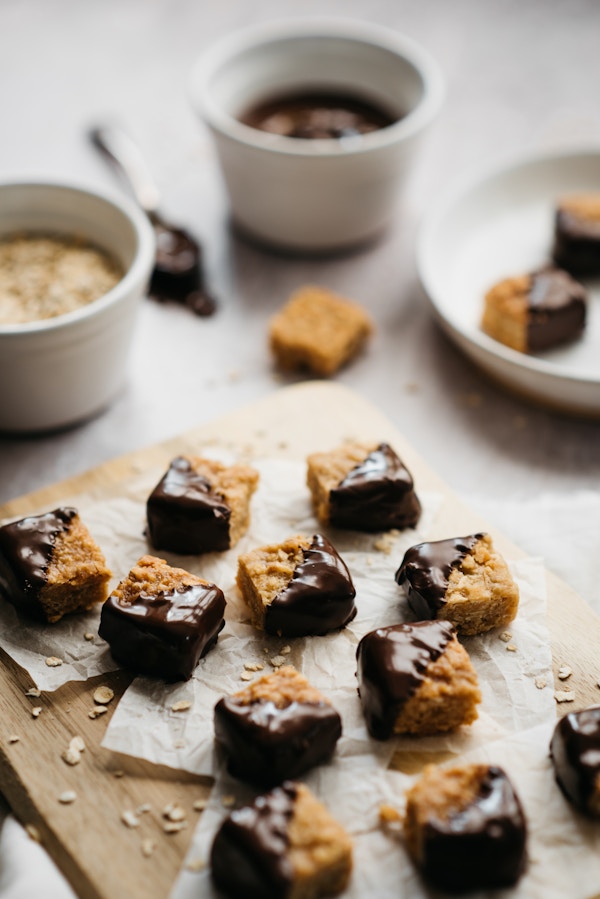
Dark Chocolate Coated Flapjacks – Silver Spoon Jubilee Recipe 2022
These tasty flapjacks are made with half jumbo and half quick oats which make them a perfect texture, plenty of bite but they don’t crumble apart too much. They hold their shape well, lovely and golden and crunchy on the edges and still a little soft on the insides. The Queen loves dark chocolate, so these ones are half dipped in delicious, melted chocolate across the diagonal for a little more indulgence.

Makes 24 small pieces perfect for passing around at your Jubilee party
You’ll need:
A baking tin 20 x 30cm greased and lined with baking parchment
Large saucepan
Wooden spoon
Rubber spatula
Large sharp knife
Pizza wheel is handy
Large bowl
Small bowl for the chocolate so you can dunk the flapjacks a good depth to coat half
Ingredients
325g salted butter
100g Silver Spoon light brown sugar
150g Silver Spoon golden syrup
250g jumbo rolled oats
250g quick-cook oats
250g dark chocolate, melted
Method
Preheat the oven to 160c fan Line a 30 x 20cm baking tin with baking parchment on the base and up the sides
Melt the butter, sugar and syrup gently on low to medium until all melty and syrupy and the sugar granules have dissolved. Use a saucepan large enough to tip in the oats
Tip in the oats off the heat and stir very well to combine and coat over the oats, pour into the tin and press firmly and evenly into the tin, use a rubber spatula or dampened hands to push down to pack into the tin.
Bake for about 25 minutes for more of a chewy finish, or if you’re more partial to a darker golden and crunchy flapjack cook on for another 5-10 minutes. Allow to cool completely in the tin, but cut into little squares when they come out of the oven (I find using a pizza wheel is useful to get nice straight cuts) before they harden completely
Once cool, lift out of the tin and use a large knife to carefully cut them apart where you’ve marked.
Dip into the melted chocolate across the diagonal and set them to dry on a piece of non-stick baking parchment. Once the chocolate gets a bit low you can use a spoon to drizzle the rest over if they become too tricky to dunk. These will keep well in an airtight container for up to a week, or store in the fridge to prolong this. They can also be frozen.
Chocolate Biscuit Cake Recipe For Silver Spoon 2022
Did you know that chocolate biscuit cake is the Queen’s favourite cake? Apparently, she loves it! I agree with Her Majesty. As a kid, I always made my mum make me a chocolate biscuit cake for my birthdays. She called it ‘my Juliet’s chocolate loaf’. It was her take on the Chocolate Juliette. She didn’t like baking, so this no bake cake was the one I always got from her, and I loved it.
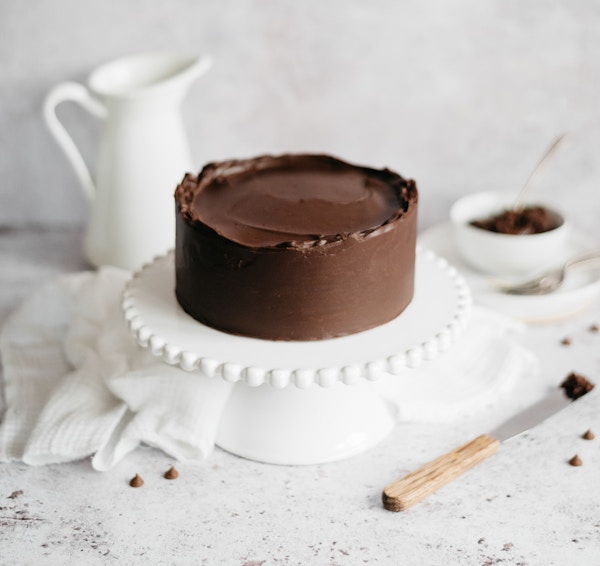
So, what else could I create than an extra special chocolate biscuit cake recipe for this once in a lifetime event!? I’ve really enjoyed coming up with this extra special recipe for the Jubilee. Something that everyone can make at home.
It’s a very simple cake to make and extremely rich. You only need a small serving, so it is good for a small gathering and will keep in the fridge for up to 5 days. It’s also one you can make ahead of all your upcoming celebrations as it keeps well. So, you can simply make a 6” round cake for a smaller gathering, or for a real showstopper, increase the quantities to make a fantastic, tiered cake.
This recipe is for a 6” round x 3” depth cake tin, however, if you wish to make a larger 8” round, double it, or to create a right royal showstopper, you can triple this amount make two cakes and stack them to build a majestic two-tier biscuit cake centrepiece.
You’ll need:
Prepared cake tin/s – 6”/8” round (min 3” depth)
Large bowls and spoons
Palette knife or spoon for smoothing
Balloon or electric whisk
Cake plate or stand
Cake turntable (optional)
Ingredients
250g Rich tea biscuits
200g good quality dark chocolate (around 70%-72% cocoa solids)
150g softened salted butter
150g Silver Spoon caster sugar
2 medium free-range eggs
1 tsp vanilla bean paste or extract
Styling notes – to add a little more pomp to the cake, piped ganache rosettes can be added to the top around the edge left plain or you can add silver leaf flecks to these and the outside. Alternatively decorate with little union jack flags or a Jubilee inspired cake topper
Method
Tin wise, using a springform is easier to release the set cake from, however they aren’t often quite deep enough and sometimes leave a bit of a ridge around the base.
If you use a regular 3” depth cake tin, you can generously grease and place a cross of baking paper which goes right up the sides leaving a little excess to enable you to lift the cake out. Simply add this cross of 2” wide strips in the base, then line the sides with a wide 3” strip of parchment and then a circle on the base. To release the cake, plunge the tin into hot water for 10 seconds or so until the butter melts and will enable you to lift the set cake out of the tin/s.
Begin by breaking the biscuits by hand into small pieces, try not to crush them. I avoid using a food processor or a rolling pin as you’re looking for good chunks of biscuit. It’s a good job to assign to kids.
Melt the chocolate and butter in a microwave or ‘bain marie’, leave to cool slightly
With a balloon whisk or electric whisk, beat the eggs, sugar and vanilla for a minute or two until the mix is foamy and the sugar grains are beginning to dissolve, then pour in the melted chocolate, continuously beating until you have a glossy chocolate mixture.
Fold through the broken biscuits and add about half the quantity needed into the tin/s, press down really firmly to pack the biscuits into the base with a rubber spatula or damp palms so you get a neat edge to the cake as this will become the top once turned out.
Cover with the rest of the mix and using damp palms push or spatula push down really firmly to pack it all in, then use a palette knife to level and smooth over the top
Chill until completely set at least 3 hours ideally overnight.
Chocolate coating – this recipe makes enough to cover a 6” round, if making an 8” double this and if making both times by 3. There may be a little excess left subject to how thickly you apply and how many holes are in the cake, but it is better to have plenty. It will freeze for 3 months or keep in the fridge for up to 2 weeks.
200g dark chocolate chips or finely chopped
100g double cream
50g butter, melted
Boil the cream and pour over the chocolate, pour on the butter.
Leave to sit for 5 minutes with a plate covering the bowl to trap in the heat, then bring the ganache together by stirring with a wooden spoon in the centre of the mix in one direction until the ganache comes together.
Set aside to cool and thicken slightly so it holds soft peaks and is spreadable.
Pour onto the top of the cake and use a palette knife to spread over the top and sides as neat as possible. Leave to set in the fridge.
If doing two tiers, you can stack the smaller tier onto the base tier then cover the entire cake or ice the 8” one separately in the same manner as above, then stack together once they have both set, but you will need to use a little ganache to fill the join. Both work it depends on what you find easiest. Decorate as you wish.
Right Royal Traybake Silverspoon Jubilee 2022
Get in the Jubilee spirit with this right Royal traybake! It will surprise your guests as the fluffy sponge is marbled red, white and blue so when it’s cut there’s an extra surprise inside it looks really cool!
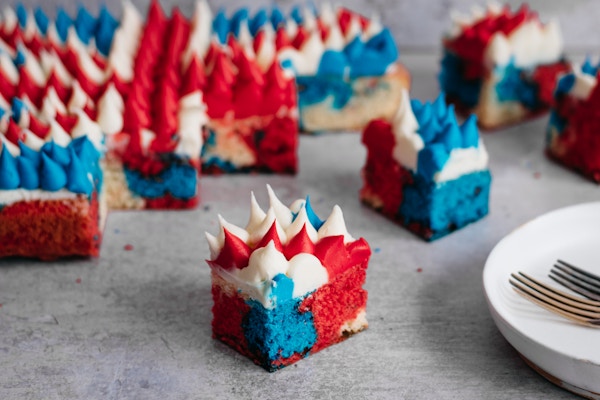
You can decorate it in so many ways to suit the occasion; either with whipped Chantilly cream and blueberries and raspberries for a classic union jack design, or keep it simple with white buttercream and red and blue sprinkles, or if you’re feeling like flexing your piping skills and impressing the neighbours, you can use a red, white and blue buttercream to pipe over a flag design. Or simply use the red, white and blue buttercream to replicate the inside and go for a marbled topping.
Tip: if using fresh cream this needs to be refrigerated, so if you’re travelling with the cake or displaying it for a few hours, you can do the flag and fruit design with a base coating of buttercream instead of fresh cream, it will look the same. Fresh cream will give you a lighter option, it’s all down to personal taste, make it your own!
We’d love to see your versions so tag @bakingmad/silverspoon so we can share your creations.
You'll need
20x 30cm traybake tin, greased and lined with baking parchment
Stand mixer with paddle attachment, electric beater ow bowls and wooden spoon
Mixing bowls
Scales
Baking parchment
Palette knife/s
Ruler
If piping, you’ll need
Scissors
Small sharp knife
Piping bags
Medium and large round nozzles (or cut a hole in the piping bags) I used 1cm for the red, 7mm for the white and 5mm for the blue.
Ingredients
300g Butter softened unsalted butter
300g Silver spoon caster sugar
6 medium free-range eggs
300g self-raising flour
1 tsp baking powder
½ tsp salt
TIP – if you want your sponge and frosting to look very white as opposed to cream, use Trex or similar white vegetable fat instead of the butter, or half and half. You may need to add a little more salt and vanilla to taste.
Food colouring in red and blue – strong gel colours work best, I’ve used Sugarflair red extra, navy and baby blue
Topping options
Chantilly Cream
300ml double cream
2 tablespoons Silver Spoon icing sugar
1 tsp vanilla bean paste
Fruit for the flag design
Approx 350-400g fresh raspberries
Approx. 150g blueberries
Buttercream options
Plain and marbled design
150g unsalted softened butter at room temperature
300g Silver spoon icing sugar
1 tsp vanilla bean paste or extract
Piped flag design
250g unsalted butter, softened at room temperature
500g Silver Spoon icing sugar
2 tsp vanilla bean paste or extract
You’ll need to tint some of the icing for the flag – keep approximately 350g of it white and colour 300g bright red and 100g blue.
Load the red into a piing bag with a large 1cm round nozzle, add 175g white into a bag with a slightly smaller round nozzle (mine is 7mm) and then the blue into a piping bag with a smaller nozzle, mine is 5mm.
Use the remaining white to spread a thin layer over the sponge before piping on the flag design.
Method
Preheat the oven to 170c fan.
Cream the butter, sugar and vanilla until very light, pale and fluffy.
Add the eggs, one at a time until all incorporated.
Dry whisk the baking powder through the flour and fold into the wet mix on slow in increments of 3 making sure it’s gently mixed through.
Divide the mix into 3 and colour 1/3 blue and 1/3 red, adding colouring until you have the desired shade.
Add the mixture to the tin using a couple of dessert spoons, making lots of alternate blobs of colour then drag a knife through the batter to swirl and marble the colours.
Bake for about 30-35 minutes until going golden and risen and a cake tester or skewer comes out clean from the middle of the sponge. Leave to cool in the tin for 5 mins then turn out onto a rack to cool completely. Meanwhile make your buttercream frosting if using. If using fresh cream, it’s best to whip this up just before topping and decorating.
Buttercream Method – Quantities Above
To make the buttercream, add 1/3 of the icing sugar and butter to a stand mixer bowl or do with an electric whisk or by hand.
Mix on slow until all the sugar is combined into the butter, add the vanilla.
Beat on medium speed for a minute or so until smooth, then add the remaining sugar in two parts in the same way. Beat until pale, fluffy and soft.
It’s best to turn the sponge upside down and use the smooth side that was in the base of the tin, it will give you a neater finish.
Option 1 – white frosting with sprinkles
Spread over the buttercream with a palette knife as evenly as you can then use the palette knife to make some luscious flicks, add blue and red sprinkles of your choice.
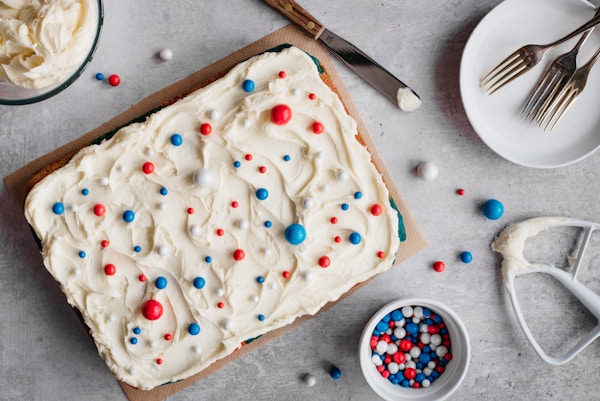
Option 2 – red, white and blue marbled icing
Remove two heaped tablespoons of the frosting and put onto a plate, mix in food colouring to each blob to the desired shade.

Spread over the remaining white buttercream as in option one and then, take a small knife or palette knife and spread swooshes of colour as you wish over the white base to add red and blue swirls. You can also add sprinkles to this design if you wish.
Option 3 Piped flag design
Spread over the remaining white buttercream thinly to the top of the cake and make halfway length ways and horizontally to give you a central cross to base the flag piping from. Begin by piping two equal sized blobs of red either side of the mark and continuing along to build up the lines to give you a wide red flag design across both ways.
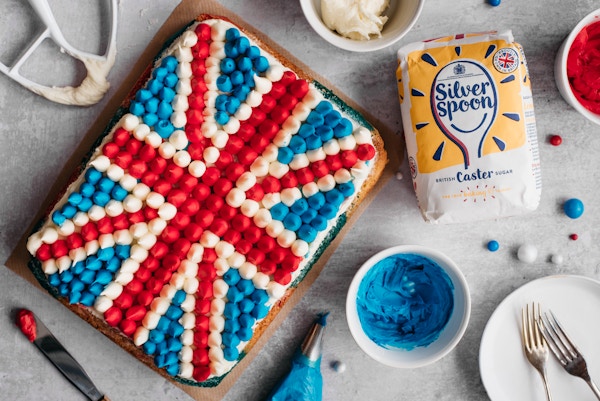
Now pipe up against the edge of this red cross with the white buttercream in neat blobs to outline it all the way up and down.
Pipe with the red blobs from each corner to meet the centre of the cross.
Pipe white blobs a little smaller by using less pressure up against these 4 red lines to frame them
Lastly using little blobs, fill the remaining sponge area blue to complete the design.
Option 4 Chantilly cream and fruit flag
Whip the cream, sugar and vanilla until just holding soft peaks and spread over the sponge. Decorate in a flag style as shown with raspberries, and blueberries for the red and blue, leaving some of the white showing through.
By Nancy Alsop
June 2022